Pages

Tuesday 24 July 2012

Apple Pie

Autumn Apple Pie in Summer
 Like I mentioned on my 1st post, apples are my favourite. The craving for apples started after dinner last night, this time was a big one.. a huge piece of american apple pie served with vanilla ice cream.. umm.. couldn't help stopping dreaming about it. Eventually, we bought Hagen-Daz vanilla ice cream and finished the 2/3 of pie tonight.:)

Bramley&Golden delicious
 Here I will show you really easy way to make a gorgeous apple pie. You will need shortcrust pastry, apples and some basic ingredients. My advice is to use Bramley and Golden delicious apples together due to its right texture and sourness which can make well-balance with sweetness of sugar. If you get delicious apples, you are already halfway! Follow me!


 You will need :

(for a 23cm pie mould)

(for shortcrust pastry)
Flour 350g
Sugar 30g
Salt its
Chilled butter 225g (cut into 1.5cm cube)
Cold water 60ml

(for filling)
Bramley 3 (approx. 615g after trimming)
Golden delicious 2 (approx. 300g after trimming)
Granulated sugar 50g
Light brown sugar 50g
Lemon juice 1-2ts
Ground cinnamon its
Salt 1/4 ts
Butter 30g
Corn flour or Ground almond 15g

1. Apple filling
   1. Cut apples into small cubes, and mix with sugars, lemon juice, salt and ground cinnamon.  Then leave it in the bowl at room temperature for 1-2hours until juice comes out.


2. Smooth dough
   2. In the meanwhile, start to make pastry. Mix flour, salt and sugar in the food processor. Once it combines well, add chilled butter in cube. Work for a 20 seconds by using pulse button until you get 'sand texture'. Straight away, start to drizzle ice water in through a tube, then work only less than 20 seconds. Never work more, just till you get moist sand texture.
 Take all out on the surface, put it tougher by hands gently. Flat it down to make it easy to roll out, then wrap it and chill in the fridge for an hour.


4. Enough excess to make pattern
   3. Now back to the filling, strain the apples to get juice. Then boil the juice and butter until it becomes half like syrup consistence. Meanwhile, combine ground almond with apples, and pour the syrup over the apples.


4. Before baking
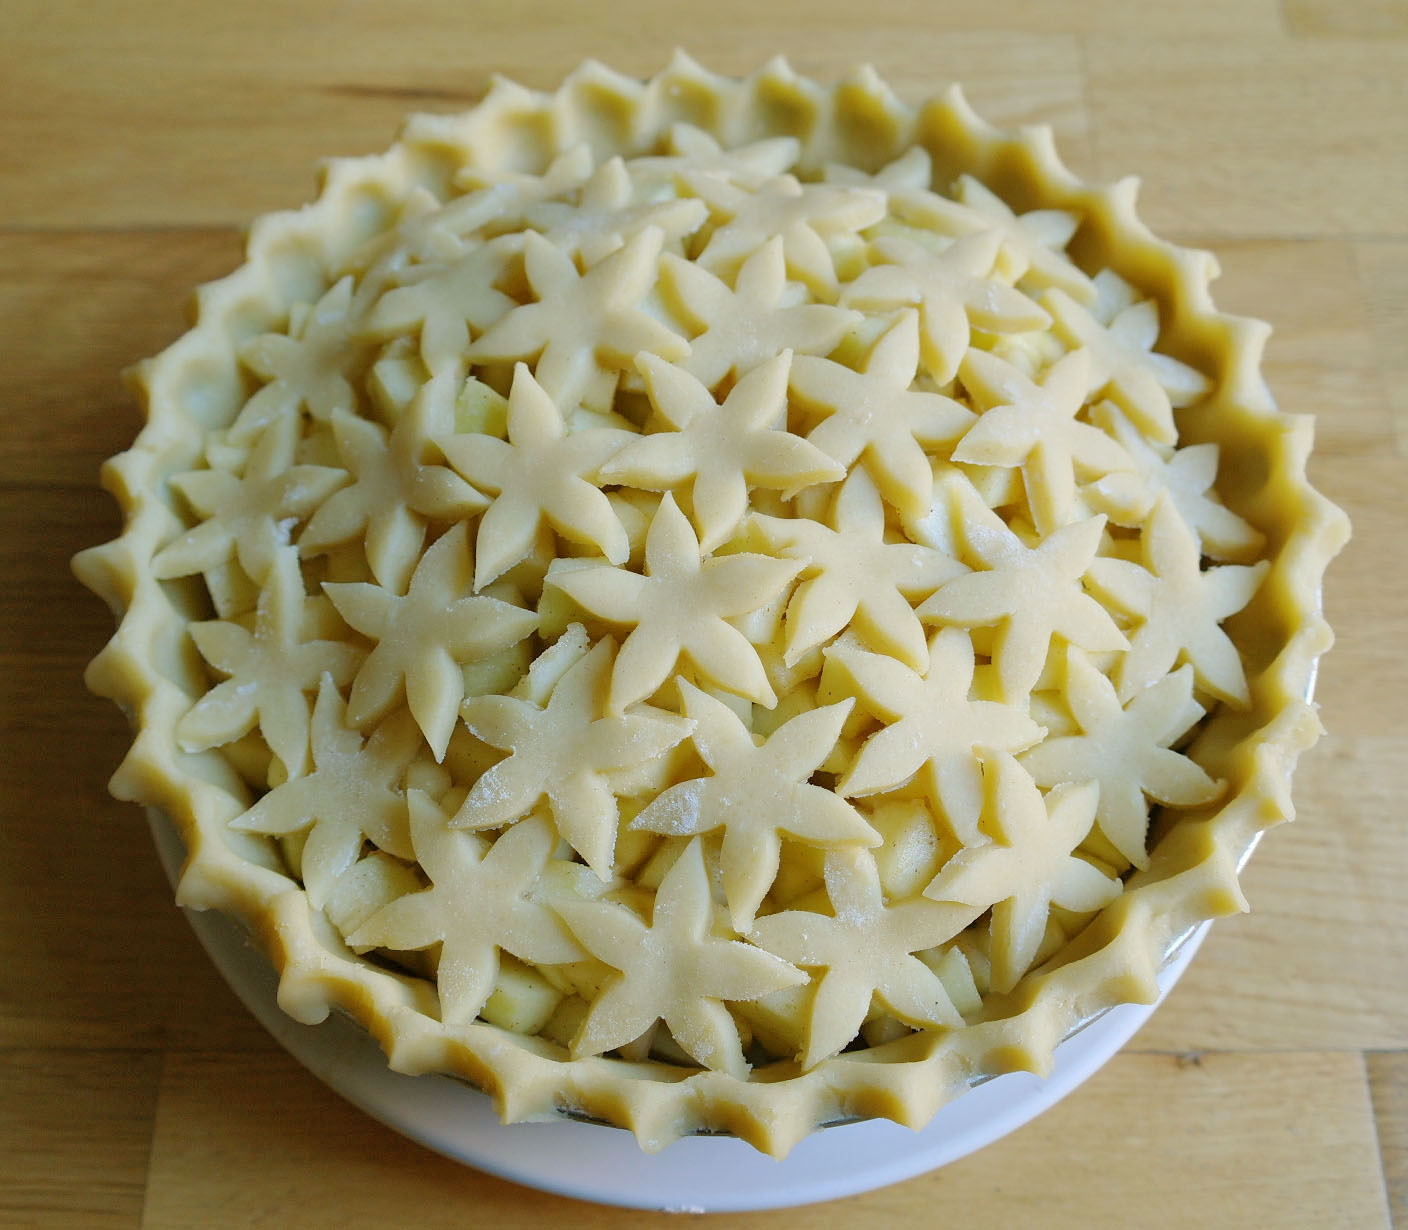
4. Fill up like dome
    4. Roll out the half of rested dough to 2-3mm, and line the buttered mould, and sprinkle some sugar inside to get crispy caramel layer. And fill up with the filling. (You can overload it as the apples are going to be shrunk a lot.) When you cover the top, you can completely cover, or can cover like me by putting all small pieces together. Then rest for 30 min in the fridge lastly.


   5. Brush egg wash to give it nice golden colour, then bake at 220'C for 45-50 min.


   ** After taking out from the oven, give it some time to cool down before slice. Now time to open your ice cream!!


Saturday 14 July 2012

Clafoutis

Individual Apricot Clafoutis
 Passing somewhere Notting Hill, a window displaying full of mouth-watering food and cake made me stop in. The place - Ottonlenghi - had very little places for sitting-in, mostly take-away, so I picked up a bagful of cake.
 One of them was 'clafoutis' with which I truly fell in love. Generally, French clafoutis is a simple flan-like dessert with cherries. Well.. because of its fluid batter, it's normally baked in a pan to hold shape, which I don't find any attraction. But I found that the clafoutis I tried was like an individual soufflĂ© without a mould, which means you can grab it up anytime without dirtying your hand. Also the thickness, which allows me to bite and, at the same time, to feel the soft texture, was just perfect for me.
 I can't keep my discovery only for me, so Chef Fran recreated it (even nicer:)), now I want to share it with everyone to let you enjoy like I did!

 You will need : (adapted from Ottonlenghi's book)

(for 6 each)

Apricot 4 each (Ottonlenghi uses plums. But personally, apricots gives the better flavour)
Eggs 3 each
Caster sugar 70g
Soft flour 70g
Vanilla extract 1 ts
Double cream 150ml
Salt a pinch
Vanilla pod 1/2
Oil a bit

   1. Preheat the oven to 170'C. Brush oil inside of the ramekins, and line the baking parchment 2cm higher than the height of ramekins.

   2. Stone apricots, and cut into 6 wedges, and place half of fruits in the bottom of ramekins.

   3. Whist yolk and half sugar until it becomes pale in colour. Fold in sifted flour, and then vanilla extract, vanilla seeds from a pod, salt and cream.

   4. Make stiff meringue with egg white and the remaining sugar. Then fold in (3) gently.

   5. Pour the batter (4) into the prepared ramekins (2) up to 3/4 of parchment, then bake it straight away for 15-20 mins. Take out quickly, then place the remaining apricots on top, and then put it back to oven. Bake for around 5 mins more until a knife inserted comes out dry.

 * Before taking out from moulds, give it time to cool down a bit in the moulds to prevent from collapse.
 ** It's not much sweet, so it can be dusted with icing sugar, or can be accompanied by ice cream.

Spritz Cookie (Using a cookie gun)


 What is this for - Cookie gun? Was wondering and ended up ordering it out of curiosity!

 This cookie gun is a small gadget to make the Spritz cookie (German, Scandinavian cookie) which has a variety of fanciful shapes when the dough is forced through a gun. Along with many German pastries, this is eaten during Christmas, and called Spritzgeback in German, meaning 'squirt' in English.

 The dough itself is traditionally very simple to make, but I made it with a different recipe. This recipe uses only Egg white so as to make the cookie lighter and more crispy. Additionally, decorated with tempered chocolate and jam to make it as cookie sandwich I love. :)


 You will need :

(for about 70 chocolate cookies)

Flour 237g
Cocoa powder 32g
Ground almond 32g
Butter, softened 250g
Icing sugar 98g
Egg white 45g
Salt 1ts
Vanilla extract 1ts


A cookie press
(1-3) Vanilla batter
 (1) Cream butter and icing sugar

 (2) Whisk meringue, then Mix into butter

 (3) Fold all dry ingredients


(4) Shoot once / each cookie
(5)
 (4) Fill the gun with this batter, and SHOOT it on the buttered tray! (Stand the gun straight, and shoot once, then take off gently.)

 (5) Press down any peaks with a watered finger

 (6) Bake at 170'C for 20 mins


(7) Done!
Choco / Lemon / Green Tea
 (7) You can eat itself, but like me, you can decorate with chocolate, and put it together with jam.

* I made 3 different shapes and flavours
   : Chocolate CooKies + White Choco + Raspberry Jam
   : Lemon Poppyseed CooKies + Milk Choco + Praline
   : Green tea Cookies + Green tea Choco + Orange Jam

 Enjoy playing with your cookie gun, there are so much fun to see how it comes out from the gun!